
Recycled Potholder Loops


Last Christmas I got myself a Potholder Loom and quickly used the loops that came with it.

Instead of buying more loops I found a way of recycling T-shirts into loops.

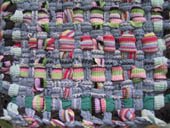
The potholder in the above picture was made from clearance rack tank tops.  They are nice and stretchy and make great potholders.

My worn T-shirts don't always do as well.  Some don't stretch as well anymore and I have to cut them longer than the tutorial suggests so they don't break.  Some don't roll as well as the new ones and I don't cut them as wide as the tutorial suggests so they are not as bulky.


This one was made with 1 inch strips. 

A few weeks ago I pulled on a pair of socks and noticed a big hole in the heel.  I was about to drop them in the trash and wondered if they would be stretchy enough for my loom.  They are!  At least from the heel up.  Between the heel and toe they are too short.  I cut them in to 5/8 inch stips.  Since the socks were striped it was easy to use the stripes as a cutting guide.

The socks are the blue and I mixed in some T-shirt strips.  This was before I started reducing the width of the strips and you can see how bulky some of the T-Shirt loops are.


Here are the strips for my latest potholder.  The T-shirt on the left has spandex in it and is nice and stretch.  This potholder will have to be decorative.  In the middle, it's not as stretchy so I will have to be careful - the next loops I cut from that T-shirt will be at least 1/2 inch longer.  An on the right is a 1 inch strip from a really old shirt.

Here's what it looks like so far:


I'm having too much fun weaving these potholders.  Sometimes after a hard day it's a good mindless activity.  I like creating something from items I no longer use and should probably throw away.  I like mixing in the different stripes and colors and seeing what happens.  I'm waiting for more socks to get holes.  I'm looking at T-shirts differently.

If I can have fun with cotton scraps, I wonder what I could do with a real loom?

Comments

Popular posts from this blog

Diverted by Dorset Buttons

I learned how to make Dorset Buttons yesterday at our monthly EGA meeting . These little buttons are so much fun to make!  We only got three rings so that's how many I made.  If I would have gotten more I'd probably be still making them.  One nice thing is that they are very forgiving.  I made countless mistakes on my first one and you can't tell. A quick google revealed lots of websites with historical information and tutorials on how to make them so I'm not even going to try to describe the process. Some people made their buttons with yarn, others used perle cotton.  One of the examples had beads on it, so once I got home I had to find some beads to sew on. That's it for now.  I'm going to be keeping my eye's open rings to use.  I'm also going to have to go through my yarn stash.  Using yarn gives a totally different result and I want to try some yarn ones too.

It's about time - the big reveal

My bright quilt was finished in June but I wanted to wait until both were done before sharing the pictures.  Quilting the blue quilt didn't take long but finishing the binding sure did.  I did procrastinate a bit as it was too warm to have a huge quilt on my lap for most of the summer.  After this, I'll probably do all the binding on my sewing machine (and stick to smaller quilts). Notice the cut-out corners?  That was a challenge.  I found instructions here and it looked easy enough but I wished I had practiced some.  After a lot of finessing I finally got good miters but I could have done much better. The cut-out corners allow the quilt to hang nicely over the edges of the mattress and it's a perfect match for a full sized mattress.  But, the top edge isn't even close to the pillows.  I wonder how the quilt fit on the bed it was made for. Here, at last, is the original quilt that I was copying.   I just...

The last 2 blocks and the tops are done!

I needed 2 more blocks to finish the gray version of the quilt.  I ended up making simple 9 patch/half square triangle blocks.  One is the yellow block in the lower left. Here it is closer up.  When I made the half square triangles I had the red fabric going the wrong way so you are seeing the backside of the fabric.  So the red in the triangles is a little lighter than the red in the center.  It wasn't worth redoing. The other corner has a blue block and I managed to get the front of all the fabrics showing. So, here's what it looks like almost complete. And here's the blue version of the quilt. I've got the backing and the batting for the gray quilt (the backing is in the washer now) and I'm working on the thread to use for quilting and how to quilt it. They are too big for me to free-motion quilt.  I don't have the space.  As it is, quilting with the walking foot will be a challenge.  These ...